Friday, May 26, 2023

Leaving a Photo Legacy

Do you know what happens with all your photos (and other digital content) on your Apple devices upon your death?! 👀

I had 2 clients this past week who did not know their loved ones will be locked out of their account and unable to retrieve photos, documents, etc. upon their death. Why? Because their spouses do not know their current Apple ID and password and they had never heard of a Legacy Contact. While it's not fun thinking about and planning for our own death, I really want to make sure my family, and my clients' families, have access to their family photos. That's why I want to share this info with you, in case you are like my clients.


So, what is a Legacy Contact and how do you set that up??


A Legacy Contact is someone you trust who you are assigning permission to and control of your Apple account upon your death. They will have access to your photos, messages, notes, files, apps and backups. They will not have access to your wallet, keychain passwords, and subscriptions. You can set up more than one Legacy Contact, though it's important to note that if you have more than one Legacy Contact, any one of them can individually make decisions about your account data after your death, including permanently deleting it.


When you create a Legacy Contact, Apple creates an access key for that person to use to get into your account. You can print the access key or have it sent to your contact via Messages (if they have an Apple account of their own). Your loved one will need to keep that access key safe until your death when they can present it, along with your death certificate, to gain access to your account. At that point they have 3 years to download and save any information they want to keep from your account. After 3 years Apple will permanently delete your account.


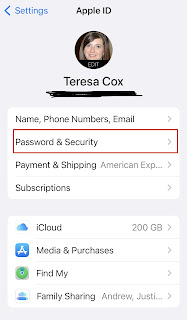
Here are the steps to creating a Legacy Contact:


1. Click on the settings icon on your iPhone.


2. Click on your Name


3. Click on Password & Security


4. Scroll down and click on Legacy Contact.


5. Select Add a Legacy Contact


You will then be able to select someone from your Contacts. Once you have chosen your contact you will have the choice to print the Legacy Access Key or send it to them in Messages. Be sure they store it in a safe place since Apple will not replace a missing or misplaced access key. You could store it with your other estate documents.  I keep my access key in my fireproof lockbox alongside other important documents.

If you want to remove someone that you previously selected, you may do so by following the above steps and clicking on their name in your Legacy Contacts and clicking Remove Contact.

So what is your alternative if you aren't comfortable creating a Legacy Contact, or you want your loved ones to have access to your photos without waiting for a death certificate? You could share your Apple ID and password with your loved one. That gives them full access to your account. But that assumes you remember to inform them each time you change your password. 😬

Another option, and one that I personally use, is storing my photos in a FOREVER account. FOREVER is a permanent digital home for all your photos, videos, and documents. In fact, FOREVER is the only cloud storage that guarantees they will save and maintain my memories for my lifetime plus 100 years. And, by setting my spouse and children up as "Friends and Family" on my account, they have immediate access to all of our family memories. They can download any of my shared files to their own devices now, or in the future. My FOREVER account is my photo/memory legacy that I will leave my children and future grandchildren. 

Please let me know if I can assist you with setting up a Legacy Contact or if you have questions about other options to future proof your family photos!

Teresa
photoconciergeservices@gmail.com

Disclosure of Material Connection: Some of the links on this page are "affiliate links."  This means if you click on the link and purchase the item, I will receive an affiliate commission.  Regardless, I only recommend products or services I use personally and believe will add value to my readers.  I am disclosing this in accordance with the Federal Trade Commission's 16 CFR, Part 255: "Guides Concerning the Use of Endorsements and Testimonials in Advertising." 


Friday, February 1, 2019

A Few Thoughts on Apple's Live Photos

What are Live Photos on Apple’s iPhone 6s and above?

A Live Photo is a combination of a 3 second .mov file and a .jpeg still photo that is taken automatically when you press the shutter button in the camera app IF Live Photos is turned on.

What can you do with Live Photos?

Live Photos have three separate editing effects that you can add to the photo; Loop, Bounce, or Long Exposure. The loop will just replay the 3 seconds over and over again from the beginning. Bounce will play forward, then backwards, then forwards, etc. Long Exposure creates an image where all the images taken within the 3 seconds are overlaid to create a soft look. In my opinion these effects are best used with photos of nature, like waterfalls, flowing rivers, etc. but not as much for people. 

To access these effects you will need to open the photo on your iPhone and swipe up. You will see Live is highlighted and you will have Loop, Bounce, or Long Exposure effects to the right. Select the one you want and it will save that effect to your photo. Simply swipe up again to change back to Live or to a different effect.


You can share Live Photos in Facebook within the Facebook app, but not from the link within the Photos app on your phone. Sadly you are not able to share any of the Live effects you might’ve used. Facebook only gives you the option to share it as Live or as a still photo.Instagram doesn’t support Live Photos at this time without the use of a third party app like Lively. 
Live Photos are fun but they take up about twice as much space as a regular still photo. They can also cause a grainier looking photo if taking photos in a lower light situation.  Unless you are going to take the time to create fun effects, in my opinion, it is best to have Live Photos turned off as your default setting so all your Photos are not Live Photos.
How to turn Live Photos off and preserve your settings.
Go to Settings > Camera > Preserve Settings
Toggle the Live Photo button to green to keep Live Photos off as your default.   


You can also check within the camera app as you are ready to take a photo. This is a quick way to verify your settings or to change from one to the other to take a photo. Just be sure to change back because the camera app will default to your last used setting the next time you take a photo.


If you need help with your photo collection, please find an APPO member in your area!

Wednesday, January 30, 2019

The Next Sort


Now that you have all your photos into "like" piles (either by themes or by year).  You need to sort through each stack again.  This second sort is to place the photos in some semblance of chronological order.  

Second Sort for Theme Organization


If you are organizing by theme, you will be trying to place each theme in chronological order.  Let's use a Christmas stack for example.  You will pick up your Christmas stack, going through it again in an effort to put your Christmas photos in chronological oder.  You are looking to put Christmas photos from 1995 together with each other, 1996 together, 2000 together etc.  If you come across a photo that you aren't sure of the date, look for a few clues in the photo, like hair length, missing teeth in children's smiles, or the same pair of pajamas as in other pictures.  If you still can't tell, make your best "guestimate".  Chances are great that no one else will know the exact year either.  Again, you want to try to move along at a quick pace, not overanalysing ever picture.  Once the photos for Christmas are all in chronological order, place them into your Legacy Box and label the section "Christmas".

Second Sort for Chronological Organization


If you are organizing by chronology only, you should have a bunch of stacks by year (or decade in the case of old heritage photos).  At this point I recommend making 12 index cards, one for each month of the year.  You will now pick up a stack that holds all the pictures from one year, let's say 2005,  and start to go through each photo and place in into a new stack with the month the photo was taken.  Again, if you don't know for sure look for clues, like summer or winter clothing, to make your best guess.  Once you have placed all photos from 2005 in our example into twelve stacks, pick them up and place January on top of February, on top of March, etc. ending with December.  This stack is now ready to be placed into your Legacy Box and labeled with the year.  Just repeat this step for each yearly stack.

Digitizing Your Printed Images


You probably would like to have some of your printed photos scanned so that you have a digital version to use in making photo books, slideshows, prints or sharing on social media.  As you are sorting through your pictures during this second sort, it's a good time to pull out any photos you'd like to have scanned.  I recommend that you pick your favorite pictures unless you really want to have all your photos scanned!  As you go through a stack, just place any photos you want scanned on the side and place them into a ziplock bag labeled with the theme or year that they belong to so you can easily replace them in their proper group after scanning.  We will discuss scanning options in another post.


Congratulations!  You now have all your photos organized, put into photo safe boxes and labeled!  Doesn't that feel great?  If you still need help, your local APPO photo organizer is happy to work alongside you to get the job done.

Thursday, March 20, 2014

Your Initial Sort

So you are all set up and ready to start sorting!  You have your photos all in one place and your table set up with all your supplies.  I recommend that you start sorting when you have some designated time to focus only on the task at hand, but plan on working for no longer than 3 hours at a time.  For most people it's hard to maintain focus for longer than 3 hours.  Depending upon how many pictures you have to go through, this initial sort could take more than one session, but you will be amazed at how much you can get accomplished in 3 short hours!

You are ready to begin!  


Don’t labor over which box of photos to start with...the best way to start is to just dive in!  During this initial sort you want to move quickly through your photos.  Try not to take time lingering over your pictures reminiscing.  If you come across blurry, out of focus, or otherwise really bad photos, toss those out during this sort.  The goal with this initial sort is to place like items together in a pile.  You should already have your index cards labeled by theme or date (see last weeks blog for more information on sorting chronologically vs. by theme).  

Open up your first box and take the first picture out and exam it quickly to determine which pile it should go in.  If you are sorting by theme you will be looking to see what event the photo is of and place it in the appropriate pile.  If you are sorting by date, you will want to pick which year it was taken (or decade for heritage photos).

Your Inner Sherlock Holmes


If you can’t immediately tell, you may have to do a little detective work.  Are people dressed in winter clothing or shorts?  Are there any objects in the background that could help you determine the time of year (an Easter basket or Christmas tree).  If you are trying to determine the date a good magnifying glass can help.  You can look for the actual date on the blackboard in a school photo or count the number of candles on a birthday cake.  I have often used hair styles/length or braces to help determine what age a child might be in a photo with no other clues as to when it was taken.

What to do with duplicates??


If you had duplicate prints made, you will need to determine what you want to do with those duplicates.  During this initial sort you will likely come across some.  If you are not sure if a picture is a duplicate of a picture you've seen earlier, set it aside to check on at the end of the initial sort.  For those you know are duplicates, you can choose to keep them together, separate them out to give away, or throw them out.  I have personally chosen to throw my duplicates away.  Yes, I spent a few dollars more to have duplicates made, but I know that despite my best intentions, I won’t really give them to other family members or friends to enjoy and I'll scan my favorites so I can make reprints later if needed.  There is no right or wrong answer to what to do with duplicates.  Just pick what feels right with you and keep moving forward.

If you get stuck and need help, don't hesitate to call your local APPO member to help you with this process. 

Tuesday, March 11, 2014

Prep Work for Your Printed Photo Organizing Session

So You are Ready to Organize Your Printed Images!


If you are like most of my clients over the age of 35 (or with children over 10 years old), you have printed photos, as well as digital images.  Maybe you have printed pictures shoved in drawers, rubbermaid containers under the bed, or boxes in the top of your closet.  Maybe you have inherited old pictures from a parent or family member through death or downsizing.  You’re likely overwhelmed by the thought of going through these photos, but you’ve decided that you must do something to get your pictures organized so you can find and enjoy them again.

It’s important to note that to organize your printed photos you will sort through your pictures more than once.  Before you start, you will need to decide if you will organize your photos by theme or chronologically.  


Chronological vs. Themes


While there is no right or wrong way, it is usually quicker and easier to organize your photos by theme instead of by date, particularly if you are only dealing with your immediate family’s photos.  Over the years we forget exactly when Sam lost his front tooth or what Susie looked like at age 6 versus age 7.  We do, however, take photos of similar events throughout our lives.  Most of us take photos of holidays, birthdays, hobbies/activities, and the places we vacation.  We also tend to search for our pictures with a particular event in mind, not a particular date the photo was taken.  When trying to decide how to sort your photos, ask yourself, “How will I search for this picture later?”  That should help you determine the best way for you to organize your photos.  The only time I recommend organizing chronologically is if you already have your photos grouped by date or you are dealing with old heritage photos, in which case I recommend you organize your photos by decades or generations.


Getting Set Up and Ready to Sort


Now that you have decided to organize your pictures and you’ve determined how you will sort them, here are some steps to take to get ready.
  1. Gather all photos into one place.  It’s a good idea to set up a table in an area of your home with good lighting where you can leave your table out for awhile without it being in the way.  Bring all the boxes and bags of lose photos, as well as any photo albums that you want to disassemble.
  2. Gather supplies.  You will need Post-it notes, index cards, cotton gloves (to keep oil off the photo), photo safe Stabilo-All pencils for marking the back, a magnifying glass, scissors, a trash bag, possibly a label maker, and a few sorting boxes (empty shoe boxes could be used).
    Materials needed before sorting
  3. Label index cards and set out on your table.  If you are sorting chronologically you will want to have index cards labeled with decades if dealing with heritage photos.  If you are just dealing with your own immediate family’s photos you can label by one-two year intervals.  For theme sorting, think about how you’d search for a photo and make an index card for all those events.
    Theme Based Sorting
    Chronological Sorting
Now you are ready to begin!  If at anytime you get stuck, feel free to contact you local Personal Photo Organizer for help!  Next week we will discuss what to do during your initial sorting session.
Teresa Cox


Tuesday, March 4, 2014

What's the Big Deal?

Welcome to my new blog!  I’ll be blogging about best practices for photo organization and other related topics.

You may be asking yourself, “What’s the big deal about getting my photos organized?”  Sure you’d like to get it done, but you just don’t have time right now and besides, your photos will still be there "one day" when you have the time to get to them, right?  The problem is your printed photos may be deteriorating if they are not stored properly and you could lose your digital photos with a computer crash.  I'd also ask you, after your family and pets, what item(s) would you try to bring with you in the event of a natural disaster or house fire?  Most people answer that their pictures are the #1 possession they'd try to save.  It's hard to save what we can't find.

Heat, humidity, sunlight, water, and dust are some of the enemies your printed photos must be sheltered from.  Your printed photos need to be stored in a temperature and humidity controlled environment, not your attic, basement, or garage.  They also need to be stored in an archival and acid free box, like the Legacy Box.  If you have pictures under glass (in a picture frame) or a magnetic style album, they may become stuck where you cannot remove them without damage.  These should be removed as soon as possible and scanned to preserve them.

Legacy Photo Box

Your digital images need to be stored in three locations.  The reality is the hard drive on your computer will crash someday and you rarely get any warning.  Flash drives and memory cards can easily become corrupted and cloud storage services go out of business.  I recommend you have all your digital photos on your computer’s hard drive, backed up on a mobile storage device (like an external hard drive, Gold DVD-R, or flash drive) that is kept in a separate location from your computer (maybe a family member’s home or in a fireproof safe), and on the cloud through a cloud storage provider like Backblaze.  By having triple redundancy, you are less likely to lose your files with a hard drive crash or natural disaster, because one of your backups is likely to remain.

I invite you to follow along the next few weeks as I discuss a simple system for getting your printed photos organized.  You can do this on your own or get the help of a Personal Photo Organizer.  Find one in your area by visiting APPO (the Association of Personal Photo Organizers).

Thanks for reading!

Teresa Cox
Certified Personal Photo Organizer
www.photoconciergeservices.com

Disclosure of Material Connection: Some of the links on this page are "affiliate links."  This means if you click on the link and purchase the item, I will receive an affiliate commission.  Regardless, I only recommend products or services I use personally and believe will add value to my readers.  I am disclosing this in accordance with the Federal Trade Commission's 16 CFR, Part 255: "Guides Concerning the Use of Endorsements and Testimonials in Advertising."